Showing posts with label Crafting. Show all posts

Wednesday, February 23, 2011

Binge v. Budget: Canvases

Image Credit {diyideas.com}
I went to go buy some canvases for the wall art collages in Ben's mancave.  I took Ben with me because I was getting some pretty large canvases and needed his large manly arms to carry them through the store for me.  (He did very well at this task except for when we got to the registers and he turned abruptly towards me to ask me a question and hit me in the face with them.)  He gasped quite loudly and protested greatly when we walked around the corner and he saw a 16x20" canvas on sale for $50. 
I quickly explained that this was the professional grade, heavy duty, gallery wrapped canvas....we were going for the cheap stuff - back stapled, on sale, and about  $20 (sale price) for a 24x48" canvas.  If you are a professionally trained artist and you are planning on doing high-end works of art worthy of the MoMA then by all means get the professional high quality canvas.

However, if you are like me and just dabble in DIY wall art made on the cheap so you don't feel guilty when you swap it out in six months, then I suggest you get the cheap stuff.  Here are some fun article ideas for DIY wall art on canvas.

Tuesday, February 1, 2011

Tip For Tuesday ~ Crafting on the go.

I am in the process of packing for my vacation and I always take along a few things with me to do on the plane.  I usually take a small crochet project and a sketch book with me.  Here are some tips for taking crochet on the plane.


1.  Get yourself some bamboo or plastic hooks.  This goes for knitting as well as crochet.  Crochet hooks tend to look less threatening than knitting needles.  This article has great tips for knitting.  While plastic hooks are cheaper I have to say I would invest the money in the bamboo.  I purchased them a year and a half ago for an Orlando, FL. vacation with my husband and they are now the only hooks I use. 

2.  Small, blunt craft scissors with a blade under 4 inches are allowed on the plane!  TSA's prohibited sharp objects list shows that "Scissors - metal with pointed tips and blades shorter than four inches" are allowed in carry one.  I am always paranoid that they are going to take away my craft scissors even child ones with blunt tips.  Also, the cruise line that we are going on has notorious crazy scissor confiscation stories and a whole message board dedicated to ways to outsmart the scissor police.  So here is an out of the box option - Empty Floss Container! 

3. Don't get to carried away.  Be realistic you will probably only work on it during the flight so work on something with only a couple of colors. 

Thursday, January 27, 2011

Hat Pin Heaven...And Gluing My Fingers Together

I finally got my hat pin findings in and with cruise a mere 7 DAYS AWAY!!!!  I was excited to start putting together some hat pins.  I got a very good start on them and made myself a variety to go with the different things I might wear on the cruise.

Hats are going to be a must on the cruise...staying out of the sun for a very fair skinned melanoma survivor is priority number one!  I quickly discovered a couple of things about the hat pins:

1.  They are very very sharp.
2.  They did not come with a nail head like pictured.
                                     3.  They are a lot more bendable than I expected

To try and prevent the top bead from sliding off I used a bit of beading glue - essentially super glue.  I managed to glue my fingers together and to the hat pin finding the last one I made for the night.


So with one hand and some nail polish remover....


I tried to get my fingers free.  5 minutes later I had one free.


5 more minutes together and I managed to get the rest of my hand free.  I will admit to still having super glue remnants on my fingers this morning.


Here are some of the results. 


Wednesday, January 26, 2011

Project Pictures - Practicing with Mod Podge

 I have been wracking my brain and searching the Internets to figure out how to achieve the look I wanted for the wall art in Ben's man cave.  I wanted to mount the pictures from the University of Maryland on canvas and then hang the canvases on the feature wall of his room.

When I searched the Internet there were many websites that had snarky answers such as, "Why would you want to mount a photo on a canvas?  Why wouldn't you just have the photo printed on the canvas?"  I had basically given up on the idea and just decided to do the collage in giant frames from the craft store.

Luckily at the homemade gift exchange last Friday my friend introduced me to the little product known as Mod Podge.  I am not quite sure how I have made it this long without knowing what Mod Podge is, but am I glad she let me know about it!  I searched Mod Podge the other day and found that there are many how to articles on how to mount photo's to canvas with it.

digitalscrapbookplace.com had a lovely tutorial on making art on canvas.  They used one print out to cover the entire canvas.  Check it out for lovely ideas for canvas art.

ehow.com had many articles on how to use Mod Podge on canvas.  They say to use the fabric kind to mount things on canvas.

For my test run I simply used the matte finish regular kind.  I used an old canvas and painted it blue with left over latex wall sample paint.  I then took pictures of my niece, nephew, and dad to make a canvas "scrapbook page"  for my dad and mom.

I didn't do the most perfect job on it - some of the pictures are mounted crookedly.  I really just wanted to get an idea of how the product would work.  I was pleased with how easy it was to use, how it adhered the photos to the canvas, and how the finish looked.  I believe I have found the technique I am going to use...now to plan out the canvases themselves.

Tuesday, January 25, 2011

Tuesday's Technique ~ Tying Up Loose Ends

 Crochet patterns always instruct you to weave in the tail of the knot after you end a color.  I have never liked the results of this method.  The kind of yarns I like to use are often very soft and sort of slick.  It tends to loosen and slip out of where you have woven it in.  


I sew down each knot in order to eliminate the worry that the crochet product will unravel or come loose.  This is how I do it:

1.)  I take needle and thread that closely match the yarn and sew through the yarn knot 3-4 times in different directions.


 2) Then I tightly loop the thread around the "tail" of the yarn 3-4 times to make a tight hold on the tail.


3)  I then guide the needle down the middle of the thread holding down the tail and make a knot and then cut the tail off close to that knot.  


This leaves me with a nice finished end that I don't have to worry will come loose.

Saturday, January 22, 2011

Homemade Gift Exchange

I recently participated in a homemade gift exchange with my friends.  We agreed to make or buy gifts for each other for a $10 limit.  I decided to make scarves for everyone doing different color / pattern combinations for each girl.

I took a basic pattern and then changed it up for each one to make a different pattern of stripes.


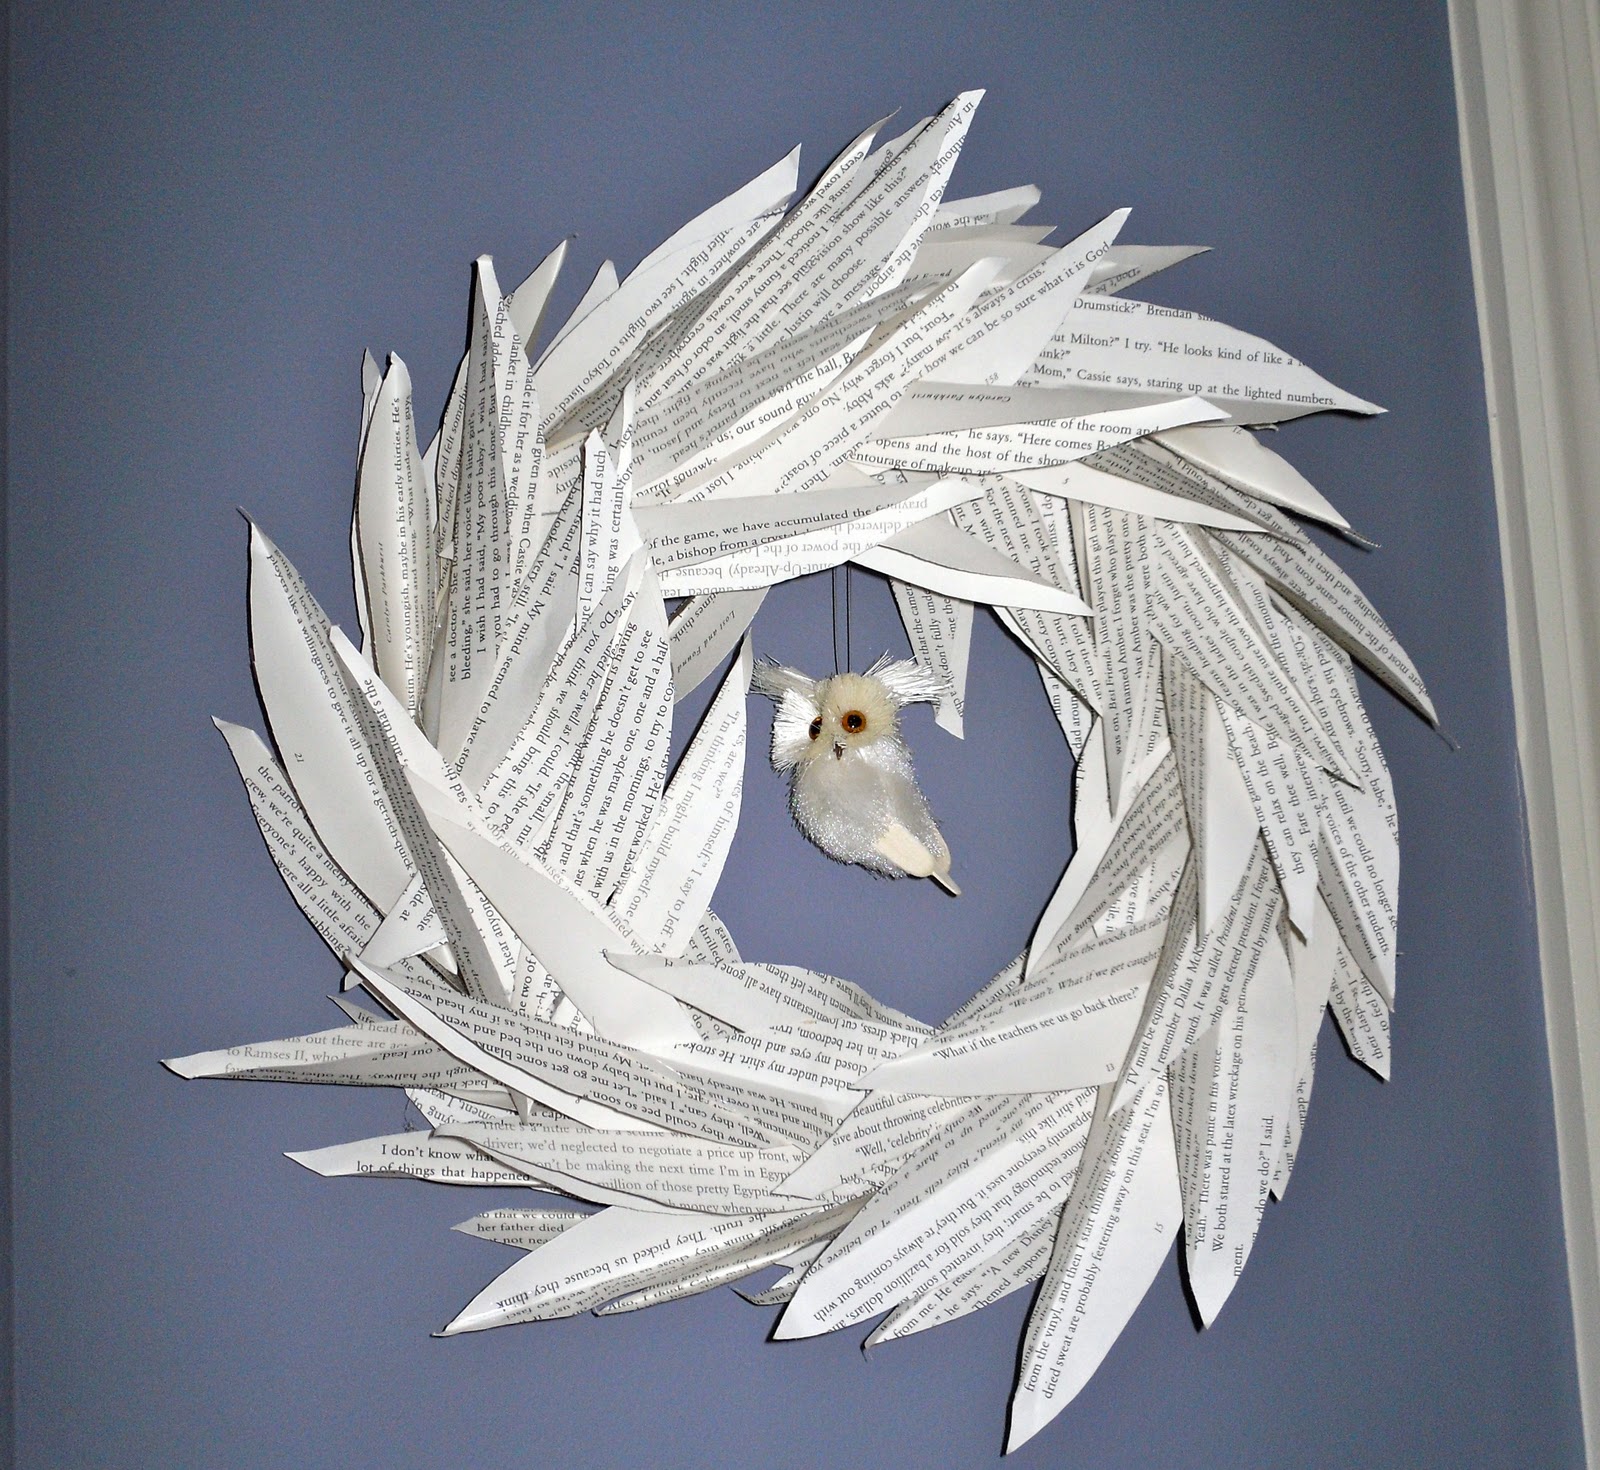
My friend Mrs. Oomph was a part of the gift exchange and made these awesome book page wreaths for us.  I actually had these on my list of projects to try, but a whole lot of deadline projects were way ahead of trying to make them.  I immediately picked the tiny one featuring an adorable owl ornament and it looks perfect in my room.

Despite the questionable literature featured on the leaves it is an awesome, unique, and handmade treasure that I love!

Thursday, January 20, 2011

Budget Buster - Wilton Class

I was very excited to start the Wilton cake decorating classes at my local craft store.  It seemed a pretty good bargain too at $27 for the four week course (one night each week).  With $5 off coupons for the two follow on classes I figured I was getting a pretty good class for not too much money.  The course ends up being a budget buster though.  Here's what I ended up spending:
  1. $71 for the class "tuition"
  2. $99 for the toolkit that I thought would provide the tools I needed for the first two courses (not the case)
  3. $50 for the course 2 and 3 class kits (after the 40% off coupons)
  4. $50 for decorator icing
  5. $8 for chocolate decorator icing
  6. $11 for colored fondant
  7. $20 for gum paste
  8. $7 for white fondant
  9. $3 cake leveler
  10. $10 cake lifter
  11. $9 cupcake decorating kit
  12. $10 tip covers
  13. $6 couplers
  14. $6 various decorating tips
  15. $8 icing colors
  16. $4 piping gel
  17. $6 meringue powder
  18. $14 turntable
GRAND TOTAL $392!!

 
This doesn't even include the cost of parchment and wax paper, cling wrap, cake boards, and ingredients for making the cakes.   Now this all was spent over 12 weeks so at $32/week it really sneaks up on you.  I didn't really have to buy everything that was on the list.  If you are interested in the class here's some tips to make it more budget friendly.


  1. $72 - just buy the class kits with the 40% off coupons and it ends up being cheaper than any of the bargain tool boxes
  2. $7 - make your own butter cream and cut down the cost of frosting significantly
  3. Skip the colored fondant - I didn't really miss it and I just used the $0.99 color to tint it for the class 
  4. Skip the cupcake kit - the cupcake nail was stupid and I didn't use it at all and the only tip I needed was the filler tip - order online before you start the class.
  5. Skip the tip covers - or buy only one pack when you get to the royal icing class.
Grand total $234 a $158 savings!  To save $30 more skip the extras like the cake lifter, extra bag of gum paste, extra tips, extra colors, and extra couplers.

Tuesday, January 18, 2011

Tip for Tuesday ~ Online Sources

I get all kinds of ideas online.  I also do a whole lot of my supply shopping online.  Here are some of my favorite online sources and what I use them for. 

Knitting-warehouse.com
This is my go to resource for buying crochet supplies online.  My favorite products on this site are the travel OK bamboo crochet hooks, Caron's simply soft and simply soft eco yarns, and Bernat's satin yarn.  My all-time favorite purchase was the Eagle good to go knitting tote which unfortunately the website doesn't carry anymore.  I would highly recommend getting one if you can find it somewhere!

wilton.com is my go to for all things cake decorating.  From ideas, techniques, to purchase of specialty cake pans I check this site to see if I can find it here.

goodybeads.com
I get many of my beads here.  My favorites from this site are the lamp work beads, the metal spacers, and metal round beads.

crochetpatterncentral.com has a huge library of free patterns for crochet.  I tend to scan this website for ideas when starting something I have never made before.  I usually get an idea of how it is put together and then change it up with colors and pattern to get exactly what I had in mind.  For the most part I have had success with the patterns and have had very little failures.  Tip: (pretty much all yarn brand websites also have a free pattern section for both crochet and knit.)

ehow.com is a vastly useful site.  I have used it to get everything from instructions on how to recover lamps and dining room chairs to making my own stencils.  I love browsing through ehow to research projects that are on my list and to find shortcuts and directions on things I haven't done before.

Friday, January 14, 2011

Spray Paint - Why I love it and why I feel like a criminal when I buy it.

I love spray paint.  I received a gift card to the Depot of the orange and white logo for Christmas and thought about what I could get with it.  I decided on spray paint because I can always use spray paint.  I love it.  It makes for a quick update on items around your house. It is easy to use, dries quickly, and goes a long way to breath new life into old things.  I always feel like a criminal when I buy it though.  You may think to yourself, "Why would she feel like a criminal?  Maybe that's guilt coming up...maybe she is a criminal!"  All not true, however, the depot treating it like a controlled substance may have something to do with it.

I always feel a little conspicuous at the depot anyways.  I come in with my knee-high boots, crazy patterned tights, girly dress, and a feathered headband in my hair.  The male population of that store always approach with a John Wayne strut....hitching up their belts to cover more of their belly they saunter over.  I can practically hear the spurs in my mind as they say, "Anything I can help you with little lady?"  At first the feminist in me bristles at the "little lady", but then I realize that I am a lady compared to the normal clientele and I am quite little.  Maybe they are just literalists. 

 
I quickly say no and make a beeline to the paint department.  I know my way around the paint department.  Like I said before I use paint all the time.  (Especially spray paint - like the dining room chair I redid by spraying straw flower yellow.)  I quickly go to the spray paint part of it and start grabbing what I want/need.   Now here is where I start to feel a little conspicuous.  They sort of follow me over as if the thought of a woman in the depot not needing help is out of the realm of reality, or maybe they just noticed I didn't have a basket and think I may need help carrying stuff as my arms are tiny and practically useless much like a T-Rex.  Whatever their reasons I can't help but feel watched, and when I feel watched in a store I feel like they think I am up to no good. 

I worry that they are going to see me grabbing spray paint cans, remember that I am in the store several times getting more and more spray paint, and then somewhere out there will be a person who decides to graffiti this...


{Image Credit: morganico-com.deviantart.com}
...and they will totally think it is me!  So feeling watched, my arms full of spray paint cans, imagining the cat graffiti someone will finger me for I begin my way to the checkout.  I prefer going to self checkout whenever I can and so I go over and begin to scan my items.  As I swipe the first can the self checkout kiosk blares out, "Assistance needed.  Must show ID to purchase this item."  I have to then wait and try not to fidget out of impatience - fidgeting makes you look extra crime-y.  Finally the Grand Poobah of the self checkout section comes over and allows me to check out the rest of my items.

I always feel as I make my way out to the car a small thrill - like I got away with something.  It takes me a few seconds to remember that I am just buying spray paint to paint my old wall art a different color. 


Wednesday, January 12, 2011

Project Pictures - Cake Testing DISASTER!

I wanted to test out my 3 mini-tier cake pan that I just got.  My cousin is getting married in August and asked me to make her a wedding cake with a small tier that they can freeze for the one year anniversary tradition.  I immediately had feelings of stress and anxiety:
  1. I have trouble saying no to people.
  2. I have never done a stacked or tiered cake before.
  3. The wedding is more than two hours away from where I live.
  4. The wedding is an outdoor wedding which means fondant - and fondant is not my strong point.
  5. It is for some one's wedding!!!!  Stress!!
So when I saw her over the holidays and she asked me about it I started with a firm no.  Then I felt really bad and said... "Well, I can make you a cupcake.  Literally one cupcake for you to do the cake cutting ceremony and one for you to freeze."  When she said it could be the tiniest cake in the world and said it could be kept inside so that I can use butter cream v. fondant I caved like a cheap Ikea bookcase.  I felt infinitely better about the whole thing when I ordered a mini 3-tier cake pan.  They are supposed to look like tiny cute wedding cakes and so last night I tested baking and decorating them.


They are evil Satan Spawn!!!

I now give you pictures of the disaster also known as the demon cakes that refused to be iced by any means.  
The Damage in Total 

This one was an attempt at poured frosting...frosting failed.
Ben still ate it and said it tasted great.

This one was iced, re-iced, attempted quick-set fondant,
scraped off  quick-set fondant, and iced again.... I gave up.

This one I sort of liked.  Basket weave is the way to go.
There were two color flow birds that looked like they
were kissing, but one broke... one by itself = not so cute.


Tuesday, January 11, 2011

Tip for Tuesday ~ Project Planning Part I

Projects go a whole lot smoother if you take the time to plan the project.  It helps if you have a plan in mind.  The first thing I do is make a list of all the projects I  (1) need to do and (2) want to do.
My list right now looks something like this:

  1. Finish girl's night gift exchange gifts
  2. Alter mom's cruise dress (20 min)
  3. Line Christopher's blanket (1-2 hour)
  4. Start hat and Scarf for Sam
  5. Neck/Ear Warmer for Tricia
  6. Bathroom Redo
  7. Ben's Man cave (several projects)
  8. Cake testing for Lauren's cake ceremony/1 year anniversary cakes
  9. Cake for Ken's b-day (January 27th)
I try to keep in mind if any of my projects have a deadline, if they do they move to the top of the list.  I use a dry erase calender that I use to write out everything I need to do marking the deadline days for any projects with deadlines.  I then make an estimate of how long it is going to take me to do each project.  For things like crochet projects or lining blankets I have a good idea how long it takes me to complete because I do those more frequently.  I also know that the cake decorations I can do in one evening and that making frosting the cake and placing the decorations will take an evening as well.  

For things that I have never done before I first do Internet research to get an idea how to do the project.  If I know anyone who has done anything similar I ask them how long it took them to do the project.  Tip: When you estimate time for a project always take a third of the time you think it will take you and add that to the total time estimate.  It always takes longer than you think!

Once you have your list of projects, time it will take you to complete the projects, and your deadlines you have - you can lay out the times on your calendar.  For example:

1) I marked deadline items on my calendar 

2) I add my to do list for each deadlined project onto the calendar in one color.

3) I add the other projects that I think I have time to work on in the "in between" times on the calendar with another color.

4) I add in breaks and time's I won't have time to work on anything in another color.

This is how I do my overall project planning.  For individual project planning check back in for Project Planing Part II. 


Friday, January 7, 2011

I've Made a Huge Mistake - Scarf Disaster


{Image Credit: http://www.patonsyarns.com/}
 So  it all started with my love of Paton's Divine yarn.  It is the fuzziest, softest feeling, puffiest looking yarn ever.  I fell in love with it.  I promptly made myself my very first crochet project of a scarf and matching hat.  I made scarves and hats for a few of my friends.  Unfortunately the yarn contains 10.5% wool and 10.5% mohair.  I discovered quickly that I had reactions to wearing anything made with any kind of animal hair.  Rabbit hair, mohair, wool, cashmere...all out. 

I always look longingly at the cashmere displays in the department stores.  I run my hands over soft fuzzy knit hats, scarves, and sweaters immediately begin itching and break out in a rash from face to belly.  I had to give up my first scarf and hat.  I now religiously read labels to see what the fabric contents are, and I constantly search for soft fuzzy yarn that is made from acrylic or some other material that will give me the same feel of the Paton's yarn.

Recently I went to my local craft store and saw a new brand of yarn in its expanded yarn section.  There on the shelf with a shaft of the purest light shining upon it was the yarn - Loops & Threads Sante Fe Striped Brushed yarn.  It looked so inviting, the color combinations pretty, and I thought to myself, "It can't be soft because it's probably wool."  I ran my hand over it.  It was soft.  I held my breath as I pulled it off the shelf and looked at the content... a host of angels began softly singing as I read  - 88% acrylic 12% polyester. 


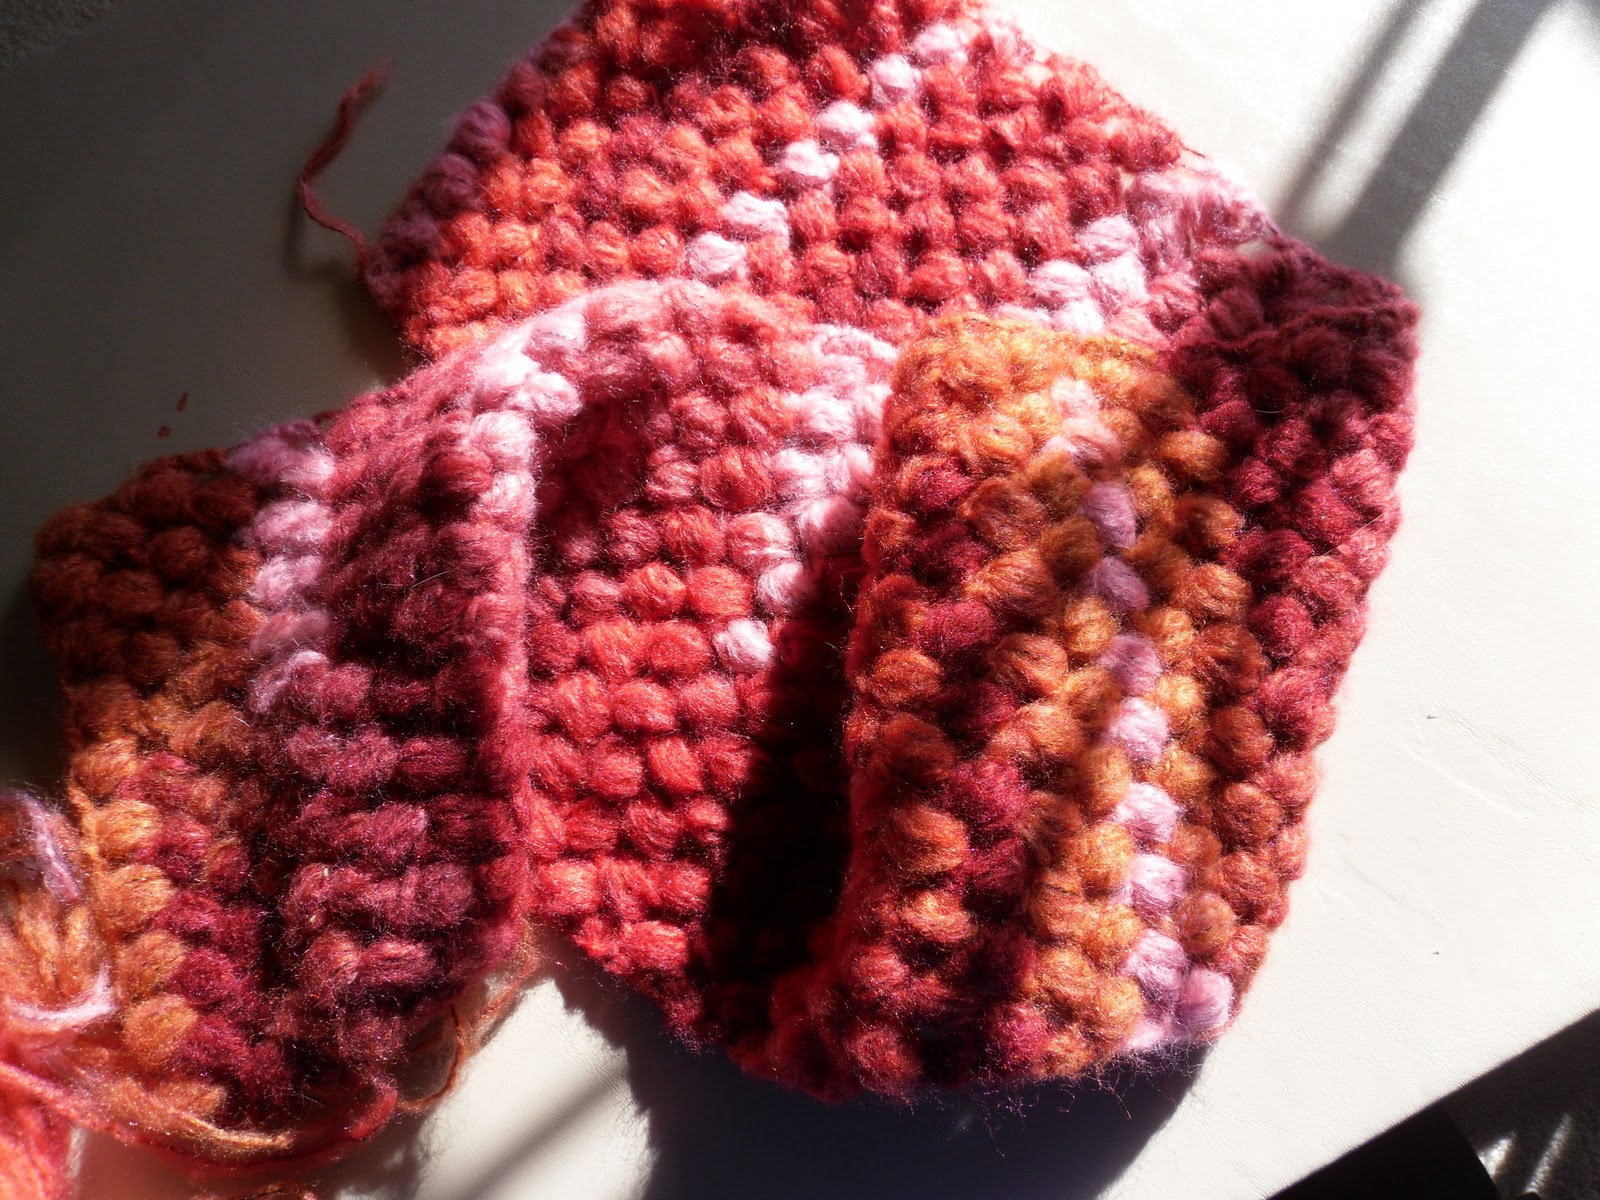
I was so excited.  I broke my budget rules and binged.  I got three skeins of each color, and at $4.99/skein it was not a cheap bill.  I got home and began my scarf.  I used the skein that was hand painted in reds, pinks, and oranges.  Well, I made a huge mistake.  Almost at the end of one skein I looked down and realized - It looks like I skinned Animal from the Muppets and made him into a scarf.


Not every project turns out how you pictured it in your mind, but in crafting you learn from these happy failures and move on.  There is always the good and the bad and the unintentionally ugly.  I am still going to wear the scarf...it does have some kind of retro 70's appeal to it.  If you realize early on that your project is headed for disaster try to abandon ship.  If you realize it half way through try to think of a way to correct course and fix it.  And if you get to the end look down and realize you have created a great big pile of fugly - toss it, donate it, or wear your mistake proudly.

Animal {Image Credit: Muppet Central.com}

Thursday, January 6, 2011

Budget v. Binge - Yarn

I have two modes when purchasing yarn for projects: budget or binge.  Usually binging wins out and I end up with way more yarn than what I need.  I end up buying too much because I but it online.  One of my favorite resources for all things yarn is http://www.knitting-warehouse.com/.  When I get on the website to order the color and quantity I need for a new project I end up getting distracted by all the other colors available.  I think to myself, "Well, that's a really pretty color and I can always use that in another project."


Well, now I have ended up with 6 bins overflowing with various yarn - some colors I have never used.  So I still end up binging, but I have made myself practice discipline when it comes to new projects. 

Are there situations where it is actually good to binge?  The answer is yes.  I am constantly re-ordering my neutrals.  White, Cream, Tan, Camel, Light Brown fly out of my bins faster than anything in my hobby room.  I also make baby blankets so colors like the softest shade blues, greens, purples, pinks, and yellow are good to have on hand in larger quantities. Crochet is one of my most participated in hobbies so I do dedicate more of my hobby spending money and organization space to yarn.  I still order my neutrals and baby blanket colors online when I am running low and order large quantities of them.  I have been mid-project and lost steam to finish it because I needed more of a color.  However, I have started practicing budget when it comes to special projects and non-typical colors. 

One thing that really undermines my budget mentality is when I go to the store, they don't have the yarn I need, and I have to go online to order it.  My binge temptation is always online, but yours may be when you go in the store and see all the lovely colors and types of yarn.  Know your weaknesses and try to use avoidance as a method of dealing with it.  If you can be disciplined online then don't drive to the store or stay away from the yarn section when you are there for something else.  If online shopping makes it too easy for you to order en mas then drag yourself out to get supplies for the project that you are starting.  (Project planning helps with sticking to your budget - post on this topic coming next week.)  

When to budget - when your spending money is tight.  To help budget:
  1. Plan out your project.
  2. Look at your inventory - can you adjust your plan to use something you already have?
  3. Shop around - don't just go to Michael's: look for prices online (don't forget to add shipping into the price/skein), think Walmart, and use coupons (http://www.michaels.com/ always has 40% coupons).
  4. Only buy what you need.
When to Binge - when all three of the following are making the perfect storm:
  1. When you have extra cash on hand.
  2. When you have a need for yarn (some of you standard colors are low/gone in your inventory)
  3. There is a sale on yarn.
So, keep in mind that planning, budgeting and discipline help eliminate overspending, overflowing mess, and unnecessary inventory.

Wednesday, January 5, 2011

Project Pictures - Finished Hobby Room

My new Ikea Storage


My brother re-purposes the old shelves to clean his room up.


Finally have room for my dress form in my hobby room.  
(You can see all the mess I still have to sort through on the side)