Showing posts with label DIY. Show all posts

Wednesday, February 23, 2011

Binge v. Budget: Canvases

Image Credit {diyideas.com}
I went to go buy some canvases for the wall art collages in Ben's mancave.  I took Ben with me because I was getting some pretty large canvases and needed his large manly arms to carry them through the store for me.  (He did very well at this task except for when we got to the registers and he turned abruptly towards me to ask me a question and hit me in the face with them.)  He gasped quite loudly and protested greatly when we walked around the corner and he saw a 16x20" canvas on sale for $50. 
I quickly explained that this was the professional grade, heavy duty, gallery wrapped canvas....we were going for the cheap stuff - back stapled, on sale, and about  $20 (sale price) for a 24x48" canvas.  If you are a professionally trained artist and you are planning on doing high-end works of art worthy of the MoMA then by all means get the professional high quality canvas.

However, if you are like me and just dabble in DIY wall art made on the cheap so you don't feel guilty when you swap it out in six months, then I suggest you get the cheap stuff.  Here are some fun article ideas for DIY wall art on canvas.

Thursday, January 27, 2011

Hat Pin Heaven...And Gluing My Fingers Together

I finally got my hat pin findings in and with cruise a mere 7 DAYS AWAY!!!!  I was excited to start putting together some hat pins.  I got a very good start on them and made myself a variety to go with the different things I might wear on the cruise.

Hats are going to be a must on the cruise...staying out of the sun for a very fair skinned melanoma survivor is priority number one!  I quickly discovered a couple of things about the hat pins:

1.  They are very very sharp.
2.  They did not come with a nail head like pictured.
                                     3.  They are a lot more bendable than I expected

To try and prevent the top bead from sliding off I used a bit of beading glue - essentially super glue.  I managed to glue my fingers together and to the hat pin finding the last one I made for the night.


So with one hand and some nail polish remover....


I tried to get my fingers free.  5 minutes later I had one free.


5 more minutes together and I managed to get the rest of my hand free.  I will admit to still having super glue remnants on my fingers this morning.


Here are some of the results. 


Wednesday, January 26, 2011

Project Pictures - Practicing with Mod Podge

 I have been wracking my brain and searching the Internets to figure out how to achieve the look I wanted for the wall art in Ben's man cave.  I wanted to mount the pictures from the University of Maryland on canvas and then hang the canvases on the feature wall of his room.

When I searched the Internet there were many websites that had snarky answers such as, "Why would you want to mount a photo on a canvas?  Why wouldn't you just have the photo printed on the canvas?"  I had basically given up on the idea and just decided to do the collage in giant frames from the craft store.

Luckily at the homemade gift exchange last Friday my friend introduced me to the little product known as Mod Podge.  I am not quite sure how I have made it this long without knowing what Mod Podge is, but am I glad she let me know about it!  I searched Mod Podge the other day and found that there are many how to articles on how to mount photo's to canvas with it.

digitalscrapbookplace.com had a lovely tutorial on making art on canvas.  They used one print out to cover the entire canvas.  Check it out for lovely ideas for canvas art.

ehow.com had many articles on how to use Mod Podge on canvas.  They say to use the fabric kind to mount things on canvas.

For my test run I simply used the matte finish regular kind.  I used an old canvas and painted it blue with left over latex wall sample paint.  I then took pictures of my niece, nephew, and dad to make a canvas "scrapbook page"  for my dad and mom.

I didn't do the most perfect job on it - some of the pictures are mounted crookedly.  I really just wanted to get an idea of how the product would work.  I was pleased with how easy it was to use, how it adhered the photos to the canvas, and how the finish looked.  I believe I have found the technique I am going to use...now to plan out the canvases themselves.

Tuesday, January 25, 2011

Tuesday's Technique ~ Tying Up Loose Ends

 Crochet patterns always instruct you to weave in the tail of the knot after you end a color.  I have never liked the results of this method.  The kind of yarns I like to use are often very soft and sort of slick.  It tends to loosen and slip out of where you have woven it in.  


I sew down each knot in order to eliminate the worry that the crochet product will unravel or come loose.  This is how I do it:

1.)  I take needle and thread that closely match the yarn and sew through the yarn knot 3-4 times in different directions.


 2) Then I tightly loop the thread around the "tail" of the yarn 3-4 times to make a tight hold on the tail.


3)  I then guide the needle down the middle of the thread holding down the tail and make a knot and then cut the tail off close to that knot.  


This leaves me with a nice finished end that I don't have to worry will come loose.

Monday, January 24, 2011

Man Cave Madness

Here is my inspiration board so far for Ben's man cave project.  Ben is all but twitching from all the color infusion going on around our house.  I want this room to be for his comfort and enjoyment while also being accessible to guests.  I think I am going to go with a monochromatic room in two shades of gray on the walls and with a white media center and black denim recliners. 

Man Cave

Man Cave by shoeaddictthriving on Polyvore.com
Not the typically tacky man cave - an eclectic collection of traditional sideboard, flat screen TV, sheepskin rugs, and modern recliners.

I want to incorporate Ben's interests without the room getting too themed or kitschy.  Also, since the TV and furniture are going to be big ticket items I want to do the decor and accessories in the room on a tight budget.  I am going to do a series of collages for the wall art from University of Maryland yearbooks I have been collecting from flea markets and EBay.  I am using the photos of buildings and the sports section of each yearbook.  I am also trying to think of something that can incorporate the University of Maryland red in the room without being overwhelming. 

I have a couple more project ideas that I need to develop, but I feel like the man cave inspiration and plan is mostly in place.  Next I need to plan out when this will all start happening.

Saturday, January 22, 2011

Homemade Gift Exchange

I recently participated in a homemade gift exchange with my friends.  We agreed to make or buy gifts for each other for a $10 limit.  I decided to make scarves for everyone doing different color / pattern combinations for each girl.

I took a basic pattern and then changed it up for each one to make a different pattern of stripes.


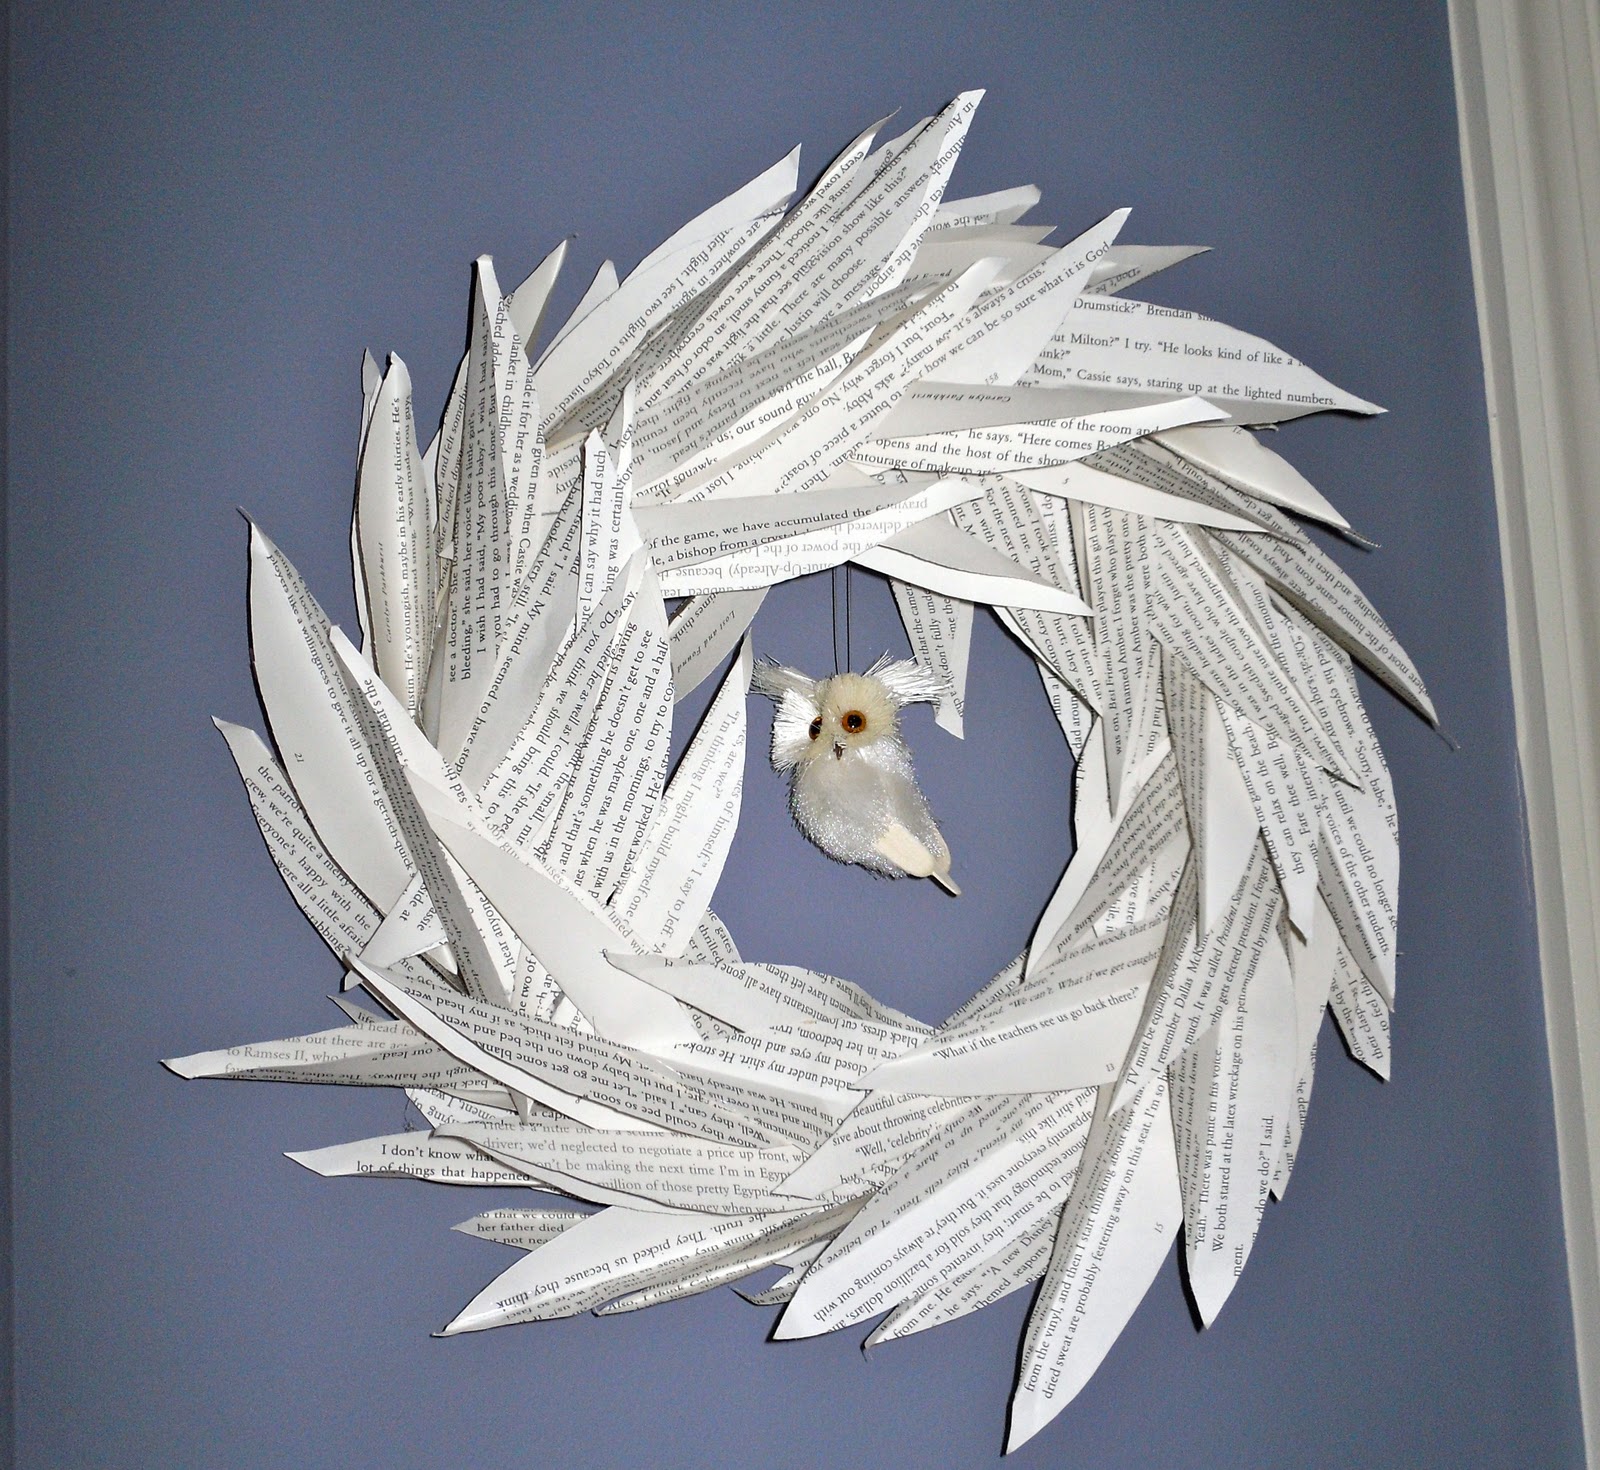
My friend Mrs. Oomph was a part of the gift exchange and made these awesome book page wreaths for us.  I actually had these on my list of projects to try, but a whole lot of deadline projects were way ahead of trying to make them.  I immediately picked the tiny one featuring an adorable owl ornament and it looks perfect in my room.

Despite the questionable literature featured on the leaves it is an awesome, unique, and handmade treasure that I love!

Tuesday, January 18, 2011

Tip for Tuesday ~ Online Sources

I get all kinds of ideas online.  I also do a whole lot of my supply shopping online.  Here are some of my favorite online sources and what I use them for. 

Knitting-warehouse.com
This is my go to resource for buying crochet supplies online.  My favorite products on this site are the travel OK bamboo crochet hooks, Caron's simply soft and simply soft eco yarns, and Bernat's satin yarn.  My all-time favorite purchase was the Eagle good to go knitting tote which unfortunately the website doesn't carry anymore.  I would highly recommend getting one if you can find it somewhere!

wilton.com is my go to for all things cake decorating.  From ideas, techniques, to purchase of specialty cake pans I check this site to see if I can find it here.

goodybeads.com
I get many of my beads here.  My favorites from this site are the lamp work beads, the metal spacers, and metal round beads.

crochetpatterncentral.com has a huge library of free patterns for crochet.  I tend to scan this website for ideas when starting something I have never made before.  I usually get an idea of how it is put together and then change it up with colors and pattern to get exactly what I had in mind.  For the most part I have had success with the patterns and have had very little failures.  Tip: (pretty much all yarn brand websites also have a free pattern section for both crochet and knit.)

ehow.com is a vastly useful site.  I have used it to get everything from instructions on how to recover lamps and dining room chairs to making my own stencils.  I love browsing through ehow to research projects that are on my list and to find shortcuts and directions on things I haven't done before.

Monday, January 17, 2011

Monday Motivation - Transforming Ugly Storage

I was motivated by a comment on my first Monday Motivation post about ugly storage solutions.  Often times innovative and cheap free storage solutions are pretty ugly.  I have a super ugly free storage solution for my cat food in my kitchen - a rinsed out empty litter bin. 

I decided to go with the simplest and fastest solution available to me today.  I took some of the spray paint I recently got and spray painted the bin straw flower   yellow.  It took four coats of spray paint to cover the bin, but the end result is OK for now.  I may try to add a pattern to it with the left over colors of paint from my canvas project when I have time.

The bottom line is that for $3.87 I was able to make it look like a cute yellow container versus a old litter container.

Friday, January 14, 2011

Spray Paint - Why I love it and why I feel like a criminal when I buy it.

I love spray paint.  I received a gift card to the Depot of the orange and white logo for Christmas and thought about what I could get with it.  I decided on spray paint because I can always use spray paint.  I love it.  It makes for a quick update on items around your house. It is easy to use, dries quickly, and goes a long way to breath new life into old things.  I always feel like a criminal when I buy it though.  You may think to yourself, "Why would she feel like a criminal?  Maybe that's guilt coming up...maybe she is a criminal!"  All not true, however, the depot treating it like a controlled substance may have something to do with it.

I always feel a little conspicuous at the depot anyways.  I come in with my knee-high boots, crazy patterned tights, girly dress, and a feathered headband in my hair.  The male population of that store always approach with a John Wayne strut....hitching up their belts to cover more of their belly they saunter over.  I can practically hear the spurs in my mind as they say, "Anything I can help you with little lady?"  At first the feminist in me bristles at the "little lady", but then I realize that I am a lady compared to the normal clientele and I am quite little.  Maybe they are just literalists. 

 
I quickly say no and make a beeline to the paint department.  I know my way around the paint department.  Like I said before I use paint all the time.  (Especially spray paint - like the dining room chair I redid by spraying straw flower yellow.)  I quickly go to the spray paint part of it and start grabbing what I want/need.   Now here is where I start to feel a little conspicuous.  They sort of follow me over as if the thought of a woman in the depot not needing help is out of the realm of reality, or maybe they just noticed I didn't have a basket and think I may need help carrying stuff as my arms are tiny and practically useless much like a T-Rex.  Whatever their reasons I can't help but feel watched, and when I feel watched in a store I feel like they think I am up to no good. 

I worry that they are going to see me grabbing spray paint cans, remember that I am in the store several times getting more and more spray paint, and then somewhere out there will be a person who decides to graffiti this...


{Image Credit: morganico-com.deviantart.com}
...and they will totally think it is me!  So feeling watched, my arms full of spray paint cans, imagining the cat graffiti someone will finger me for I begin my way to the checkout.  I prefer going to self checkout whenever I can and so I go over and begin to scan my items.  As I swipe the first can the self checkout kiosk blares out, "Assistance needed.  Must show ID to purchase this item."  I have to then wait and try not to fidget out of impatience - fidgeting makes you look extra crime-y.  Finally the Grand Poobah of the self checkout section comes over and allows me to check out the rest of my items.

I always feel as I make my way out to the car a small thrill - like I got away with something.  It takes me a few seconds to remember that I am just buying spray paint to paint my old wall art a different color. 


Monday, January 10, 2011

Monday Motivation - The Three R's


Real Simple.com - Coffee Mug to Plant Holder
This morning's motivation is all about re purposing.  I love using old things in new ways and having it make a visual impact in my home decor.  I just started going to flea markets this year when my good friend Mrs. Oomph took me out to show me the ropes.  Our first time out was a great hit.  I got tons of things for really cheap and promptly became addicted to flea markets, thrift stores, and antiques. 

One of my favorite parts of flea marketing is going through a bunch of junk and looking into what will make a great treasure.  I almost always think of what things can be outside of their original purpose. 

Mrs. Oomph already covered how you can re-use and re-purpose old frames in her blog entry 5 minute oomph: wicked easy wall art.  One of my favorite sources for re-purposing ideas and inspiration is the Real Simple magazine website.  They have an awesome section of their magazine and website titled New Uses for Old Things.  (Side Note ~ if you had to only get one subscription to one magazine I would definitely get Real Simple.  My husband got it for me two years ago and it is like Christmas every time a new issue hits my mailbox.)

Here are a couple of my favorite re-purposing projects  -  What are yours?  Submit them to this email to share sewhandcrafted@yahoo.com.


Milk pail for $2 at flea market - re-purposed to a plant holder.


Ivory Soap crate - re-purposed as a towel shelf.


Friday, January 7, 2011

I've Made a Huge Mistake - Scarf Disaster


{Image Credit: http://www.patonsyarns.com/}
 So  it all started with my love of Paton's Divine yarn.  It is the fuzziest, softest feeling, puffiest looking yarn ever.  I fell in love with it.  I promptly made myself my very first crochet project of a scarf and matching hat.  I made scarves and hats for a few of my friends.  Unfortunately the yarn contains 10.5% wool and 10.5% mohair.  I discovered quickly that I had reactions to wearing anything made with any kind of animal hair.  Rabbit hair, mohair, wool, cashmere...all out. 

I always look longingly at the cashmere displays in the department stores.  I run my hands over soft fuzzy knit hats, scarves, and sweaters immediately begin itching and break out in a rash from face to belly.  I had to give up my first scarf and hat.  I now religiously read labels to see what the fabric contents are, and I constantly search for soft fuzzy yarn that is made from acrylic or some other material that will give me the same feel of the Paton's yarn.

Recently I went to my local craft store and saw a new brand of yarn in its expanded yarn section.  There on the shelf with a shaft of the purest light shining upon it was the yarn - Loops & Threads Sante Fe Striped Brushed yarn.  It looked so inviting, the color combinations pretty, and I thought to myself, "It can't be soft because it's probably wool."  I ran my hand over it.  It was soft.  I held my breath as I pulled it off the shelf and looked at the content... a host of angels began softly singing as I read  - 88% acrylic 12% polyester. 


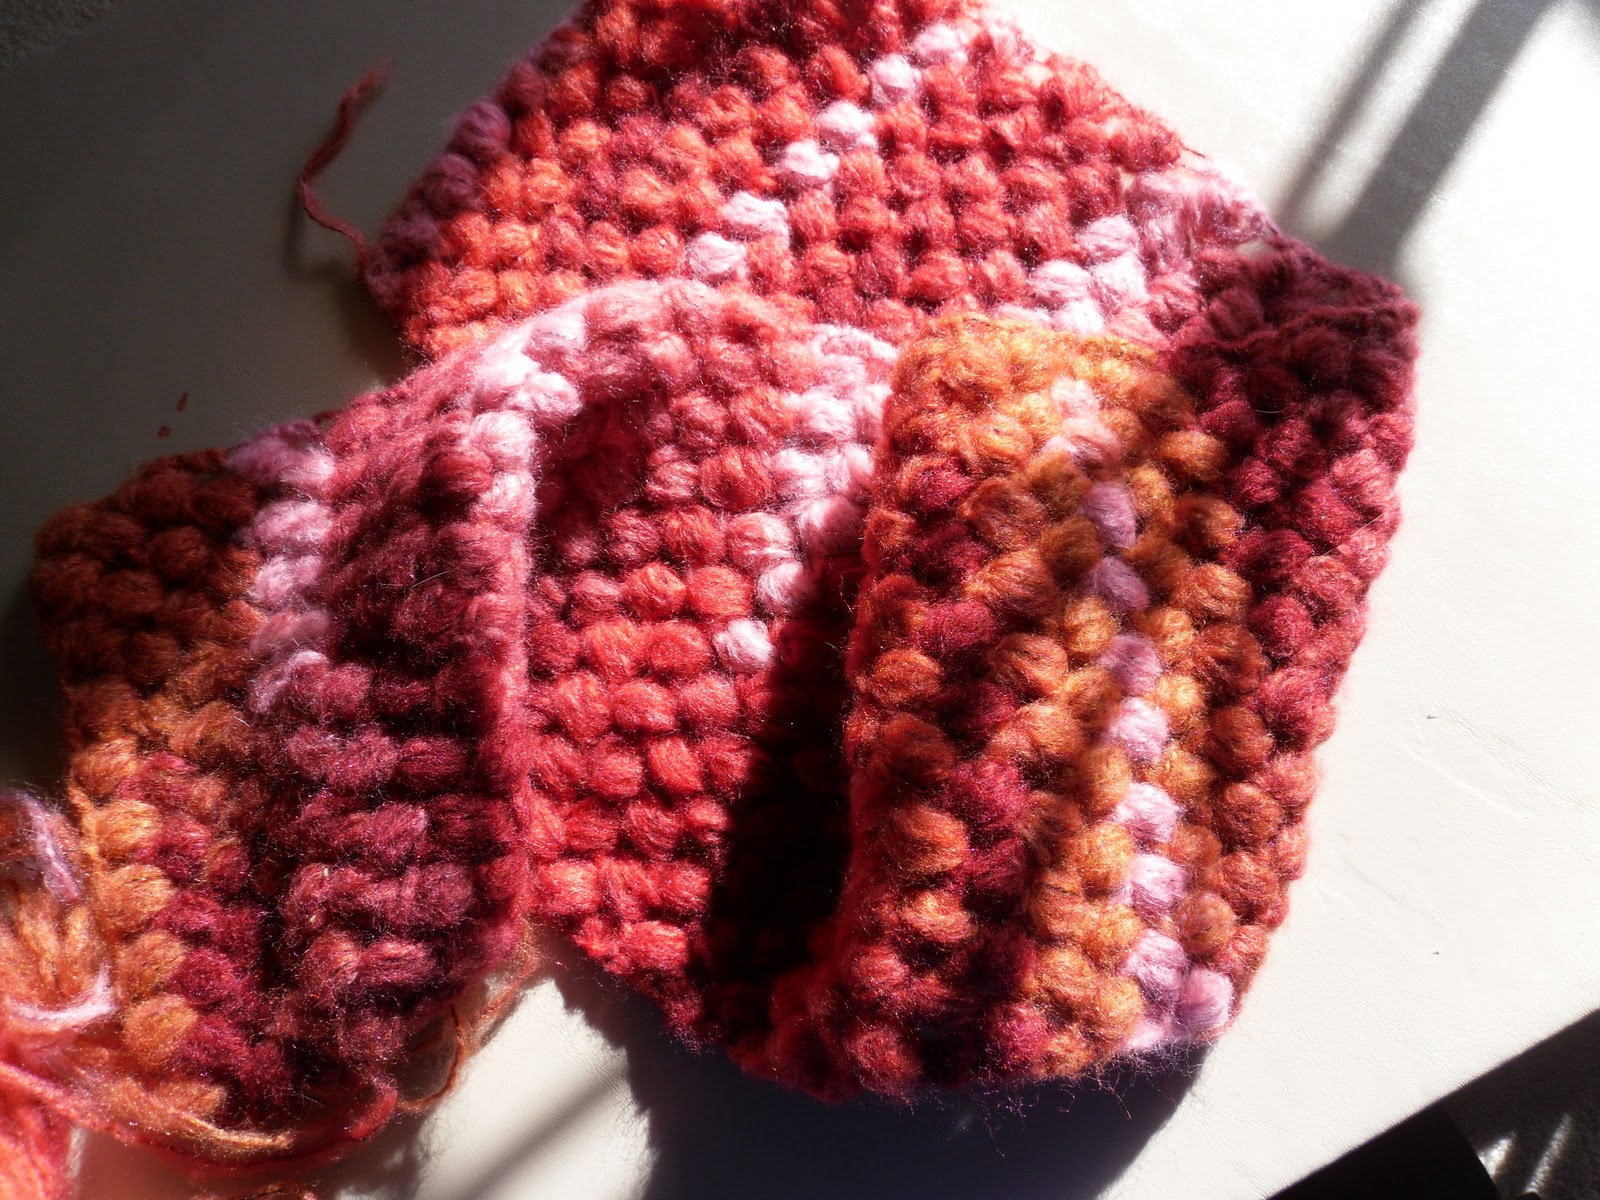
I was so excited.  I broke my budget rules and binged.  I got three skeins of each color, and at $4.99/skein it was not a cheap bill.  I got home and began my scarf.  I used the skein that was hand painted in reds, pinks, and oranges.  Well, I made a huge mistake.  Almost at the end of one skein I looked down and realized - It looks like I skinned Animal from the Muppets and made him into a scarf.


Not every project turns out how you pictured it in your mind, but in crafting you learn from these happy failures and move on.  There is always the good and the bad and the unintentionally ugly.  I am still going to wear the scarf...it does have some kind of retro 70's appeal to it.  If you realize early on that your project is headed for disaster try to abandon ship.  If you realize it half way through try to think of a way to correct course and fix it.  And if you get to the end look down and realize you have created a great big pile of fugly - toss it, donate it, or wear your mistake proudly.

Animal {Image Credit: Muppet Central.com}

Wednesday, January 5, 2011

Project Pictures - Finished Hobby Room

My new Ikea Storage


My brother re-purposes the old shelves to clean his room up.


Finally have room for my dress form in my hobby room.  
(You can see all the mess I still have to sort through on the side)


Tuesday, January 4, 2011

Tip for Tuesday: Fake it


Chair from Arhaus furniture

I decided that I am sick of buying generic wall art even if I get it cheap from somewhere.  I figure... even though I don't really know what I am doing.... I can fake it.  I recently made a series of wall art for my kitchen makeover.  I was inspired by a new chair with a unique pattern that my husband let me get for our anniversary.  I really wanted to tie in the pattern, colors, and feel of the chair into my whole living space.  I started by taking pictures of different "pieces" of the pattern that I liked.    I got these photos printed in the size of the canvases I was going to paint on.  I got a cheap 10 pack of canvases for about $10 at Michael's for this.  I probably could have achieved the same look by just framing the prints, but I love the texture that canvas and real paint add.

I then traced the larger shapes and parts of the pattern onto tracing paper in order to make a stencil.  I used an exacto knife to cut out pieces of my homemade stencil and then traced the overall shapes onto the canvases.  For example: in the following picture I first cut out the "meat" of the bulb and the stem shapes.   You can see on the left where the red arrows are pointing on the photo.  I after I had the basic shapes traced on the canvas I added in the details by hand.  As you can see the patchwork pattern on the largest part of the bulb is not remotely the same, but it still gives the overall appearance and feel of the original pattern.  

For paint I had already purchased sample interior latex paints from colors in the pattern to decide what colors to carry over onto the kitchen walls.  I used the sample paints to paint in the details of the patterns.  I ended up doing at least two coats of each color.  The paints cost about $3 each for a total cost of $39.  I would have used regular acrylic paints, but didn't want the sample paints I had already purchased to go to waste.  In total the project cost me $49 and gave me a large statement wall in the kitchen.


It took me about 2 hours to complete each canvas.  The latex paint dried fast and I was able to start the second coat as soon as I had finished the first coat.  When I finished all of my canvases I just arranged and re-arranged them on the floor in front of the wall they were going on until I had what I wanted. 


For those that will look at this and say, "I am not artsy at all.  I don't know how to paint."  Try this for a similar look.  Get stencils of patterns at your local art/craft store.  Stencil the patterns on various canvases and then paint them in.  (If you want to do it really fast you can use spray paint or roll one color on with a mini roller!)  You can do the same pattern with the canvases facing different ways like above or you can really mix it up and paint the pattern in a variety of colors and color combinations to make your own one of a kind wall art.  

You don't have to be a trained artist to have original art hanging on your walls - just fake it with confidence.  If you have any suggestions of DIY wall art add it in the comments!